суббота, 29 декабря 2012 г.

Доброго вечора!

Пройшло трішки більше чотирьох місяців після останнього посту - ще літнього. Сьогодні на носі уже найчарівніший час року і, відповідно, найприємніший час для кулінарії.
Прошу вибачення за таку непостійність ( напевно, я аж надто часто прошу за це вибачення — і в цьому, власне моя постійність). Скориставшись американською традицією складати новорічні резолюції, я берусь стверджувати, що у 2013 році буду долати постійність своєї непостійності в усьому, і в оновлені цієї сторінки в першу чергу.
В найближчі дні (одразу після декорування ялинки) - тільки святкові страви, як завжди вегетаріанські, прості і приємні у виконанні.
Смачного вам Нового Року!)

Good evening!

It's been a little bit longer since my last post – summery one. Today it's almost New Year's which happens to be the most celebrated, the most magical season in Ukraine. And therefore the most inspiration season in terms of cooking.
I apologize for such inconstancy (probably this inconstancy is one of my only constant character traits). I am now making a traditional American thing: a New Year's resolution. In 2013 I have to overcome my inconstancy in everything and first of all in updating this blog.
The next few days after decorating a tree all my time is going to be devoted to holiday cooking: vegetarian and simple as usual.
Have a delicious New Year.! =)

воскресенье, 26 августа 2012 г.

Тарт-Піцца \ Tart-Pizza

Тарт-Піцца

Ось рецепт страви, якій не можна дати однозначного імені. Це ніби і пиріг, але не конвенційний, ніби і схоже на піццу, але також не зовсім, скоріше всього - тарт. Легко, смачно і по-літньому. Смачні соковиті овочі на житньо-пшеничному красті.

Інгредієнти:
Тісто
1\2 скл води
1 чл цукру
2 чл дріжджів
1\4 скл пива
1 чл солі
1\2 скл житнього борошна
1\2 скл цільнозернового пшеничного борошна
1\2 скл білого борошна

Соус:
2 чл томатного джему
1 стл соєвого соусу
2 стл вершків
1\2 чл солі
1\2 чл орегано

Овочі за смаком.
1 баклажан
1 томат
1\4 солодкої цибулі

Тісто. Спершу змішати воду, цукор та дріжджі. Дати постояти хвилин 5- 10. Додати пиво та сіль. Поступового додати усе борошно і замішати у липке, але пухке тісто. Дати постояти 30 -50 хв у теплому місці. Викласти та вирівняти тісто на змащеному олією противні.
Для соусу просто змішати усі інгредієнти до однорідної консистенції.
Тепер залишається лише скласти пиріг. Тісто змазати соусом. Викласти овочі, нарізані тоненькими скибочками. Посолити, поперчити, збризнути оливковою олією та присипати петрушкою. Випікати при 175 20-25 хв. Якщо ви хочете зробити це більш схожим на піццу, то за 5 хв до того, як пиріг буде готовим, присипте натертим твердим сиром.
Смачного!


Tart-Pizza

Here's the recipe which can not have the exact name. It's sort of a pizza, but not really, I would much rather call it a tart. It's easy, delicious and summery. Tasteful and juicy vegitables on the rye-and-wheat crust.

Ingredients:
Dough
1\2 cup water
1 tsp sugar
2 tsp dry yeast
1\4 cup bear
1 tsp salt
1\2 cup rye flour
1\2 cup whole wheat flour
1\2 cup all-purpose flour

Sauce:
2 tsp tomato jam (or ketchup)
1 tbsp soy sauce
2 tbsp cream
1\2 tsp salt
1\2 tsp dried oregano

Vegetables of your choice
1 eggplant
1 tomato
1\4 sweet red onion

Dough. Firstly mix water, sugar and yeast. Let it sit for 5-10 minutes. Add salt and beer. Gradually add the flour and make sticky but puffy dough. Let it sit in a cozy place for 30-50 minutes. Then spread it thinly on oiled baking sheet with your hands.
For the sauce simply mix all the ingredients. Evenly spread the sauce over the dough.
Now put together the tart. Lay the vegetables( thinly sliced) over the dough. Sprinkle it with salt and pepper, drizzle with olive oil. Bake at 175 degreed ( C) for 20-25 minutes. If you want ti make it more like pizza, sprinkle it with shredded cheese on the last minutes of baking.
Bon apetit!

четверг, 23 августа 2012 г.

Гарбузове морозиво \ Pumpkin Ice-cream

Гарбузове морозиво

Вчора мені, нарешті, пощастило придбати гарбуз. З невідомої мені самій причини я обожнюю гарбуз і усе, що з ним пов”язано: форму, колір, смак, запах... Коли він в сезоні, я просто не можу ним натішитись, додаючи його до усього і готуючи його усіма можливими способами. Ось перший “гарбузовий” рецепт, яких надалі, напевно, буде ще багато.
Сьогодні гарбузове морозиво, так як літо ще досі з нами на тиждень і ще трішки літніх ласощів не зашкодить.
Інгредієнти:
3\4 скл цукру(1\2 + 1\8 +1\8)
1 стл борошна
1 чл кориці
1\8 чл меленої гвоздики
1\4 чл меленого мускатного горіха
1\4 чл меленого імбиру
3 яєчні жовтки
2 скл гарбузового пюре ( я приготувала гарбуз на пару і потовкла його товкачкою для картоплі, можна також гарбуз відварити або запекти і перетворити його у пюре за допомогою блендера)

Перш за все варто підготувати гарбуз: перетворити його у пюре і додати 1\8 склянки цукру.
У каструлі з важким дном змішайте 1\2 склянки цукру, борошно і спеції. Підігрійте суху суміш на слабкому вогні протягом 3-5 хвилин, постійно помішуючи. Потім поступово додайте молоко. Продовжуйте перемішувати і доведіть суміш до легкого кипіння. Зніміть з вогню.
В окремій мисці збийте жовтки з 1\8 склянки цукру доки він не розтане. Додайте 1 склянки гарячої суміші до жовтків, збиваючи при цьому. Поверніть суміш до каструлі і додайте гарбузове пюре і підігрівайте на слабкому вогні, постійно помішуючи. Продовжуйте, доки суміш трішки загусне. Дозвольте суміші охолонути до кімнатної температури і помістить до морозилки (або морозивної машинки, якщо вона у вас є) на кілька годин.
Смачного!


Pumpkin Ice-cream

Yesterday I could finally find a pumpkin at the farmers market. For some reason I'm really crazy about everything about pumpkin: it's shape, it's colour, it's taste, it's smell. When it is in season I just can't get enough of it, adding it to everything and cooking it in every possible way. So this is the first pumpkin recipe, but there will probably be a lot of those.
Today it's ice-cream, since the summer is still on for another week and one more summery treat wouldn't harm.

Ingredients
3\4 cups sugar(1\2 + 1\8 +1\8)
1 tbsp flour
1 tsp cinnamon
1\8 tsp ground cloves
1\4 tsp ground nutmeg
1\4 tsp ground ginger
3 egg yolks
2 cups pumpkin puree ( I cooked pumpkin over steam and mashed it with potato masher, you can boil or bake the pumpkin and puree it with blander)

First of all prep the pumpkin by pureeing it and adding 1\8 cup sugar to it.
In a heavy-bottomed pan combine 1\2 cup sugar, flour and all the spices. Heat this dry mixture over low heat mixing all the time for about 3-5 minutes. Then gradually add milk. Keep mixing all the time and bring the mixture to a gentle boil. Take it off the heat.
In a separate bowl beat the egg-yolks with 1\8 cup sugar till the sugar dissolves. Add 1 cup of hot milk mixture to egg yolks while whisking. Then return the mixture to the pan. Add the pumpkin puree to the pan and start heating it over low heat. Keep stirring until the mixture thickens. Let it cool to room temperature and then transfer to freezer ( or ice-cream maker if you have one) for few hours.
Bon apetit!

среда, 22 августа 2012 г.

Легкий суп з цвітної капусти/Light cauliflower soup

Легкий суп з цвітної капусти


Зважаючи на те, що усі овочі зараз в сезоні, важко триматись на відстані від кухні. Сьогодні лише легкий суп, ідеальний для ланчу або вечері спекотного літнього дня. Все приготування займе менше години часу, а уся користь літніх овочів опиниться у вашій тарілці. Ось рецепт.

Ітгредієнти:
1 стл оливкової олії
1\2 стл вершкового масла
1 цибулина середнього розміру ( дрібно нарізана)
1\2 морквини ( нарізана)
1\2 скл дрібно нарізаної цвітної капусти
1\2 скл нарізаних кубиками цукіні
1\4 скл зерен кукурудзи
1\2 -1 томат, нарізаний скибочками
1 стл борошна
1 1\2 л киплячого овочевого бульйону або киплячої води
1\2 чл томатного джему ( або будь-якого іншого)
1 стл соєвого соусу
сіль та перець до смаку
Підігрійте олію та масло у каструлі з важким дном. Додайте цибулю і дозвольте їй трішки проготуватись протягом 1-2 хв. Далі по черзі додайте овочі: моркву, цвітну капусту, цукіні, кукурудзу, томат, витримуючи паузу(1-2) між кожним додаванням. Коли усі овочі уже достатньо м”які, додайте борошно, і постійно помішуючи готуйте ще протягом кількох хвилин. Влийте до каструлі киплячий бульйон, джем, соєвий соус і дозвольте супу легенько покипіти кілька хвилин. Вимкніть вогонь. Додайте сіль на перець і дозвольте супу настоятись протягом 5-10 хв.
Суп готовий до подачі.
Смачного!


Light cauliflower soup

With all the vegetables in season It's hard to stay away from the kitchen. Today just a simple and light soup that makes a perfect lunch or dinner on a hot summer day. It will take less then hour to cook but all the goodness of vegetables is going to end-up in your bowl. So here it is.

Ingredients:
1 tbsp olive oil
1\2 tbsp butter
1 medium size onion (diced)
1\2 carrot (chopped)
1\2 cup chopped cauliflower
1\2 cup diced zucchini (deseeded)
1\4 cup corn
1\2 -1 tomato, diced
1 tbsp flour
1 1\2 l. boiling vegetable stock or boiling water
1\2 tsp tomato jam (or any other jam)
1 tbsp soy sauce
salt and pepper to taste

Heat the oil and butter in a heavy-bottomed pan. Add onions and saute them for 1-2 minutes. Then one by one add carrots, cauliflower, zucchini, corn, tomatoes holding a pause of 1-2 minutes before each addition. When all the vegetables are soft add flour, mix well and cook for another couple of minutes. Add the vegetable stock, jam, soy sauce and boil for few minutes. Turn off the heat. Add salt and let sit for 5-10 minutes.
Now it's ready to serve.

Bon apetit!

вторник, 21 августа 2012 г.

Tomato day. Tomato jam.

Томатний день.Томатний джем

Близько тижня тому був один із тих ідеальних спокійних днів, коли можна було без задніх думок присвятити увесь час кулінарії : трапляється такий настрій не часто, а враховуючи ще вдале поєднання з літнім сезоном, сьогоднішній день був винятковим.
Прокинулась я тоді разом із сонцем, щоб втрапити на ринок якомога раніше і придбати найсвіжіші і найароматніші томати і баклажани( саме за запахом я обираю усі продукти, особливо овочі та фрукти; аромат безвідмовно розповість вам про фрукт навіть те, на що не натякає його зовнішній вигляд. Справді хороші овочі і фрукти мають в першу чергу приємно пахнути, а бажано дихати своїм ароматом. ) Цілий ранок витратила на миття, бланшування, очищення і нарізання томатів. Якраз до заходу сонця мала закритими у слоїки два варіанти томатного джему (що став для мене відкриттям року! раджу обов”язково спробувати), та джем із баклажанів. Ділюсь уже випробуваним рецептом томатного джему, який видався мені найкращим. 
Базувалась я на рецепті з блогу Food in Jars, який мені пощастивилось знайти кілька тижнів тому. 
За дегустаційною вечерею ( які часто відбуваються у мене вдома, коли щось незвичне готується вперше) моя сім”я схвально оцінила цей джем і більше того придумала десятки способів його застосування у подальшому. Деякі з них уже і випробували. Французька порада: томатний джем із м”яким сиром ( типу брі, або камамбер) — це дууже! смачно. Або його завжди можна тоненьким шаром покласти у сендвіч, зробити частиною заправки до салату. Також я спробувала додати його у тісто для маффінів і була дуже задоволена результатом. Одним словом, спробуйте. Впевнена, що у цьому кожен знайде щась для себе.


Tomato day. Tomato jam.

A week or so ago I had one of those perfect harmonic all-day-in-the-kitchen days without any disturbing thoughts or the need to rush. Such a mood doesn't come along too often and adding summer season the whole thing has turn out to be exceptional.
I got up with the sun and got to the farmers market as early as possible to get the freshest and the most aromatic (cause it's the smell that the unmistakable guide in picking groceries) tomatoes and eggplants. The entire morning was spent washing, blanching, peeling, dicing tomatoes and eggplants. I was finished right with the sunset and got two kinds of tomato jam ( the recipe for one I'm gonna share) and eggplant jam, which was a real discovery for me this year ( but it still needs some improvement so I'll share it a bit later).

So here's tomato jam. The recipe is based on one I've read on Food in Jars blog some time ago.
It's great as it is with pancakes, on sandwich, with cheese. I've already tried to add it to salad dressing and to make muffins with it was delicious. Here it is.

Ingredients:
2-3 kg (5-6 pounds) ripe aromatic tomatoes ( washed)
4 cups sugar
8 tbsp lemon juice
1 1\2 tsp freshly grated ginger
1 tsp cinnamon
1\2 tsp ground cloves
1 tsp salt
1\2 tsp finely chopped chili pepper

Tomatoes have to be finely diced, leaving the seed and the skins.
Combine diced tomatoes with all the other ingredients in a heavy-bottomed pan, mix well and put on the medium heat.
Bring to boil, stirring occasionally. Turn the heat down a little bit and boil for couple of hours (1-3 depending on the amount of water in your tomatoes) until the mixture becomes jammy( thick enough) . Don't forget to stir from time to time.
Томати потрібно нарізати дрібними кубиками, залишаючи насіння та шкірки.
Змішати нарізані томати з усіма спеціями у великій каструлі з важким дном, ретельно перемішати і поставити на середній вогонь.
Prep the jars. Wash them well and sterilize ( can be done in a pot of boiling water, I do it in the oven by gradually heating g them from room temperature to 125 degreed (c )).
Pour the boiling jam into hot jars and tightly close with the leads. Turn the jars leads down, cover with kitchen towel and let cool to the room temperature (preferably over night)


I got about 2 liters of jam with this recipe but the amount can be different depending on tomatoes that you choose to use.

P.S. This is the first time I write a canning recipe so I don't feel very confident and comfortable in writing the instructions. If someone decides to use this recipe or has any questions about canning jams, ask me. I don't guarantee the absolutely correct answers but I can definitely share some of my own experience and mistakes.

понедельник, 6 августа 2012 г.

Сорбет із смородини / Currant sorbet

Сорбет із смородини


Продовжуючи тему льодяних літніх десертів, пропоную вашій увазі надзвичайно смачну, корисну й ідеальну для спекотних днів річ — сорбет. Сорбет — це свого роду щербет, який однак, не містить ні краплини вершків чи яєць, а отже, не містить жирів та холестерину. Цей літній десерт складається виключно із фруктового пюре(фрукти можна використовувати будь-які) та невеличкої кількості цукру: справжнє задоволення без жодного почуття вини.

Інгрідієнти:
1 л свіжих ягід чорної смородини
1 л свіжих ягід червоної смородини
1 скл цукру
2 1\2 склянки води
2-3 стл сухої глюкози(опціонально)

Готується це задоволення дуже просто, однак доведеться витратити трішки часу і приготувати його заздалегіть.
У великій каструлі змішати воду, цукор, глюкозу і довести до кипіння. Додати ягоди й варити 5 хв після того, як почне кипіти. За допомогою блендера збийте це все у пюре, пропустіть через сито. Дозвольте суміші охолонути й відправте до морозильної камери. Поки сорбет заморожується його потрібно щогодини ретельно перемішувати й збивати міксером ( це робиться для того, щоб льодові кристали не виростали дуже високими і десерт був м”якшим і шовковішим. Коли сорбет замерз ( хоча б до такого стану, який вам до вподоби), його можна подавати. Однак їсти його потрібно терміново, бо він швидко розтає.
Смачного і свіжого вам літа!)


Black&Red Currant Sorbet

Keeping up with the summer here's a recipe for perfect treat for the hot day. It doesn't contain even a drop of cream or eggs and therefore doesn't contain any cholesterol. It is made only with fruit puree and a little bit of sugar, which makes sorbet a real guilt-free delight.

Ingredients:
1 l. (4 cups) fresh black currants
1 l. (4 cups) fresh red currants
1 cup sugar
2 1\2 cup water
2-3 tbsp glucose syrup(optional)

It doesn't take much effort to prepare but you'll have to think of it ahead.
In a big pot mix water, sugar, glucose and bring to boil. Add the berries, bring to boil and cook for another 5 minutes. Puree everything with the blender and press it through the fine sieve. Let the mixture to come to room temperature and put it into the freezer. While the sorbet freezes mix it every hour with electric beater ( it helps to incorporate some air into the sorbet and prevents the ice crystals from growing too big). When it freezes to the right condition (judge with your eye) serve it and eat immediately!
Hope your summer is fresh and delicious!

воскресенье, 5 августа 2012 г.

Літо і думки про зиму / Thinking of winter while it's still hot


Що-що, а часом надмірна турбота про "потім" дуже характерна слов"янам. Чи то через циклічність аграрного календаря, за яким жили наші предки століттями ( та і що там: досі живуть!) чи то через історичну пам"ять: а достаток у нас не завжди був, чи то просто від прагення мати шматочок літнього сонця і смаку у своїй комірчині, але різноманітних літніх закруток у нас роблять чимало. Роки два тому до цих літніх кухонних обрядових дійств долучилась і я: правда не дуже масштабно. Серед тих небагатьох слоїків, що таки опиняються на полицях мого балкону, більшість - джеми і варення.
Цей рік, порівняно з переднім - не найактивніший ( частково через мою тривалу відсутність в сезон багатьох ягід, частково через морози минулої зими, що залишили нас без багатьох літніх фруктів) .
Як би там не було, уже закрито джеми з червоної та чорної смородини, чорної горобини, вишень, чорниці і ожини. Попереду є кілька експериментальних задумок, що я планую втілити у життя на цьому тижні, зокрема, томатний джем.
Була б дуже вдячна, якби хтось мені підказав, що можна закрити в банку у вигляді конфітюру або джему.


Thinking of winter while it's still hot.


Among all the others one of the most typical trait of Slavic mentality is tendency to think too much about “tomorrow” (food-wise I mean) . It might be due to centuries of living in accordance to cyclic agricultural calender ( and some still keep living in that rhythm) or it might be due to historic memory: Ukrainians have never had much wealth in posses, or it might be due to the desire to have a piece of summery sun and taste stored in jar. Anyhow, the amount of canning done by Ukrainians every summer is just impressive. I started to get involved in all of these ritual kitchen performances of canning about two years ago. Not on a grand scale,though. Among the few jars that get to the storage shelves on my balcony most are jams.
This year in comparison to the previous one isn't the most active one ( partly due to my absence when lots of berries were in season and partly due to severe frosts in Ukraine last winter, which damaged some of the fruit and nut trees leaving us without some of the summer fruits) .
Anyhow, I have already canned red and black currants, black ashberry, cherry, blueberry and blackberry jams. Still have some plans. This week I'm going to try to make tomato jam. Later on apple & carrot and pumpkin jams. And I would be very grateful if somebody could suggest any other fruit or vegetable that can be put into jar as a jam. Thanks. =)

четверг, 2 августа 2012 г.

Пиріг з чорної горобини / Ashberry pie


Пиріг з чорної горобини.

Серед багатьох причин любити літо, розмаїття ягід очолює мій список. Сьогодні я вперше готувала з чорною горобиною: вийшло навіть краще, ніж я сподівалась. Терпкість з ягід під час приготування кудись зникла ( я ще не можу сказати точно, що саме цьому посприяло, але з”ясую це в подальшому), але характерний горобиновий смак залишався. Я навмисне уникала використання спецій у цьому рецепті, спираючись виключно на “базові” інгредієнти, щоб можна було чіткіше оцінити смак ягоди, з якою готую вперше. Смакові імпровізації ще попереду. Раджу спробувати приготувати цей пиріг, якщо натрапите десь на цю ягоду.
Завтра: джем з чорної горобини. І чекаю осені, щоб спробувати в десертах і червону горобину.

Інгредієнти:
  • 1 л цілих ягід чорної горобини (вимитих і подріблених блендером)
  • сік одного лимону
  • 2 скл цукру (1 1\2 + 1\2)
  • 4 стл кукурудзяного борошна ( 3+1)
  • 6 жовтків
  • 3\4 скл молока
  • пісочна основа для пирога

В першу чергу варто спекти основу. Викладіть її рівним шаром у форму для торта або пирога, проштирхніть виделкою кілька разів, і випікайте при 175 градусах протягом 20 — 25 хв.
Для начинки змішайте у сотейнику перетворені у пюре ягоди з 1 1\2 скл цукру, 3 стл кукурудзяного борошна і лимонним соком, поставте на вогонь і доведіть до кипіння, періодично перемішуючи.
Тим часом в окремій мисці збийте жовтки з 1\2 скл цукру. Додайте молоко та 1 стл кукурудзяного борошна, збийте. Коли ягоди закипіли, поступово додайте половину гарячого пюре у жовтки, активно при цьому мішаючи. Поверніть цю суміш назад до сотейника і готуйте на слабкому вогні, доки суміш трішки не загусне (або не розпочне кипіти).
Влийте ягідну суміш у спечену основу для пирога і випікайте при 175 градусах протягом 35-40 хв.
Перед подачею дозвольте пирогу охолонути.
Смачного!
P.S. Сподіваюсь на відгуки, а також інші рекомендації по використанню чорної горобини.
P.S. Пиріг стає ще смачнішим, якщо його порізати на шматочки і заморозити. 


Ashberry pie

Among all the different reasons to love summer the top of my personal list is the variety of berries it offers. Today I cooked with black ashberries for the first time and it came out to be better than I expected. The acerbity of these berries just disappeared at some point ( I'm not sure what was the main reason for that yet) but the distinctive ashberry flavor remained. Purposely I avoided using any spices and tried to stick to the most basic ingredients so that it would be possible to experience the actual taste of ashberry. Improvisations with taste are ahead. I recommend you making this pie if you happen to run into these berries somewhere.
Tomorrow: black ashberry jam. And waiting for fall to come so that I can try out red ashberries as well.
Ingredients:
  • 1 l. of ashberries (washed and pureed with blander)
  • juice of one lemon
  • 2 cups sugar (1 1\2 + 1\2)
  • 4 tbsp cornmeal ( 3+1)
  • 6 egg yolks
  • 3\4 cup milk
  • pie crust

As usual with the pie: start with baking the crust. Line the pie dish with pastry, stick it with fork few times and bake at 175 degrees (c )for 20-25 minutes.
For the filling mix the berry puree, 1 1\2 cup of sugar, 3 tbsp of cornmeal and lemon juice in a big sauce pan. Start cooking it over low heat and let it come to gentle boil, stirring occasionally.
Meanwhile beat the egg yolks with1\2 cup sugar until light. Add milk and 1 tbsp of cornmeal, mix well. When the berry puree has come to boil, gradually add 1\2 of hot mixture to the yolks while stirring. Return the mixture to the sauce pan and cook over low heat until it starts to thicken, stirring all the time.
Pout the berry mixture into the pie crust and bake for 35-40 minutes at 175 degrees ( c).
Let the pie cool completely before serving.
And the pie gets even better when cut into slices and frozen. 
Bon Apetite!

P.S. Hope to hear what you think if you try it as well as to hear some ideas for cooking with black ashberries.

среда, 1 августа 2012 г.

Садиба мого дідуся / My Grandpa's Garden


Сьогодні, вперше після повернення з Франції, я вибралась до Острога, де живе мій дідусь. Ось декілька фото з його садиби. Візит був коротким, тому ніяких бур”янів повирвати мені не вдалося, але я планую повернутись туди на цих вихідних. 


Today, for the first time after returning home form France I got to go to Ostrog, where my grandpa lives. Here are some pictures of his garden. Due to a short visit I didn't get a chance to weed anything, but the plan is to come back there this weekend. 

 Остання малина цього сезону / The last raspberries of the season

 Бджола з пилком на лапках / A bee covered with pollen

 Маленький огірок /Tiny cucumber

 В теплиці / In the greenhouse

Некласичність: сирно-баклажановий десерт / Non classical: cheese-n-eggplant dessert.


Напевно, не дивно, що з початком ведення цього маленького блогу про кухню думати я майже не перестаю: і серед усіх ідей нових страв, що не дають заснути ввечері, довгих і регулярних прогулянок по місцевому ринку у пошуках нових, цікавих інгрідієнтів, відслідковування асортименту магазинів з кухонним приладдям, безкінечних розмов про їжу з найрізноманітнішими людьми, по-трішки почала вимальовуватись і свого роду онтологія кухні, хоча й ще надто метафорична. (До власне феноменології кухні, а також етики, естетики, метафізики тощо я ще торкнусь у подальшому). Так от, кухня — це ніби театр маріонеток, в якості яких виступають окремі інгредієнти. Куховар смикає за ниточки. От тільки на відміну від ляльок у театрі кожен продукт має свій характер і для того, щоб вистава вийшла успішною потрібно знайти спільну мову з кожним із них. Є класичні вистави ( чи бодай класичні етюди), які безвідмовно спрацьовують щоразу, варто лише слідувати рецептам — і це чудово. Однак, як і до будь-якої галузі знання чи мистецтва сьогодні, до кухні також існує некласичний підхід, що кидає виклик тому, що колись величалось нормою... (далі буде).
Так от, досить випадково, кулінарним девізом мого літа стала фраза “Овочі — в десерти!”. Тут уже публікувалось кілька рецептів з 
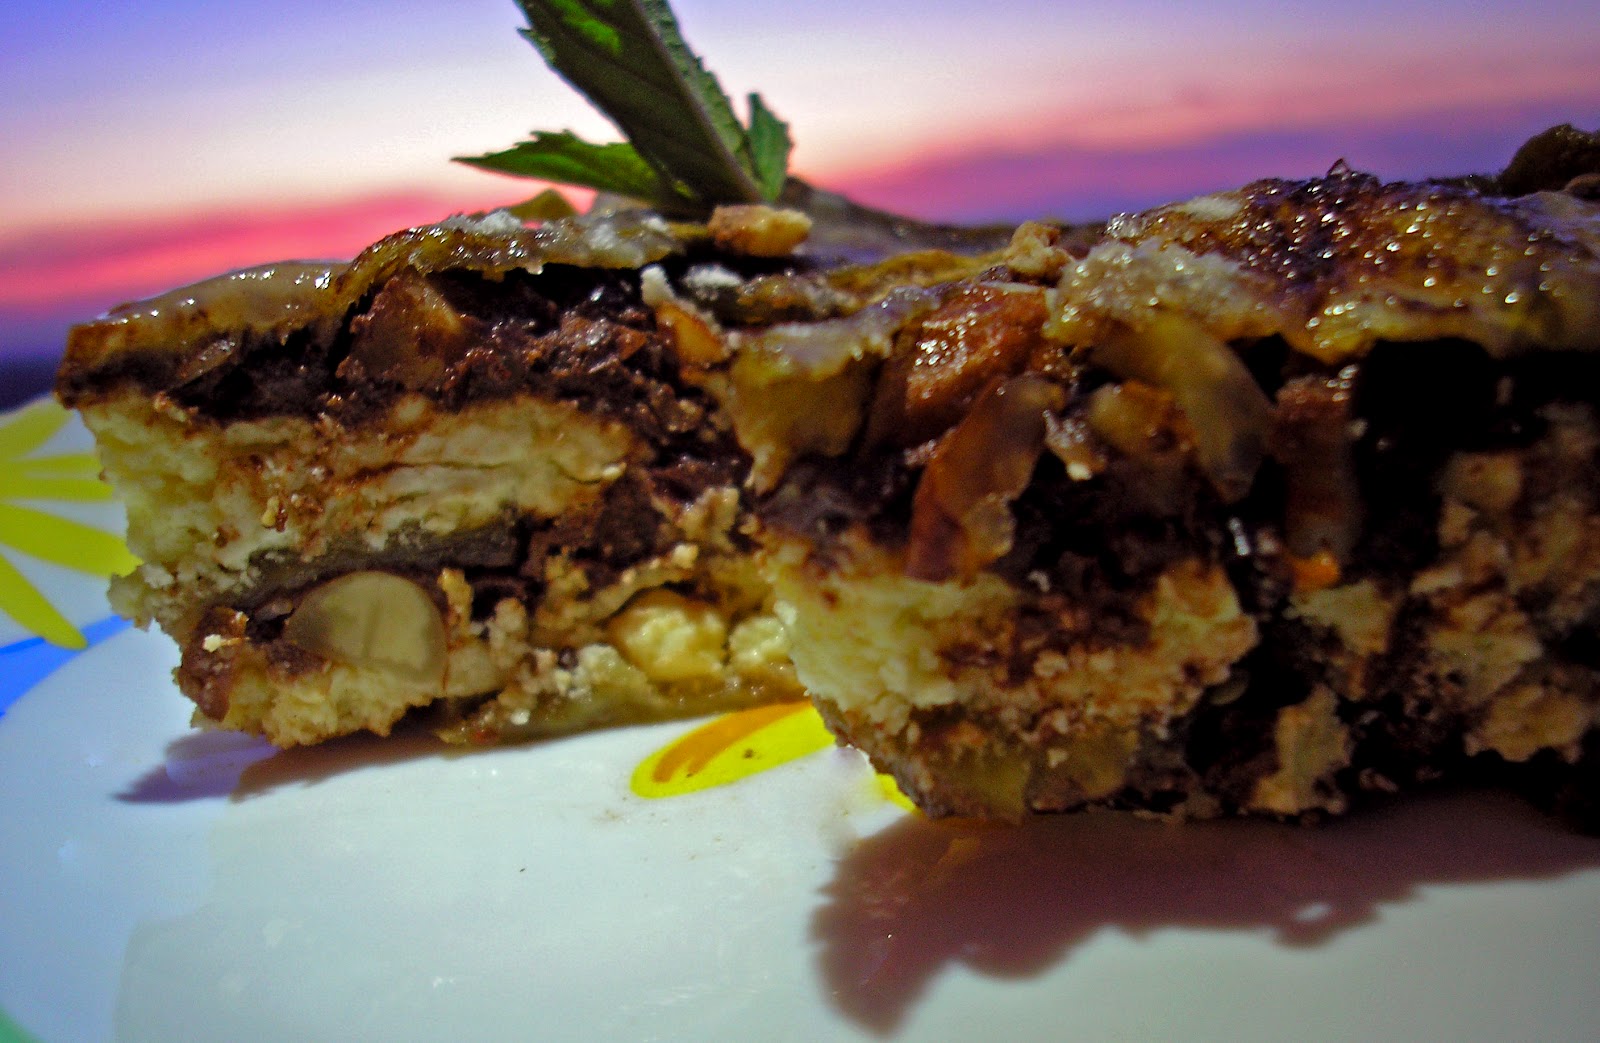
цієї серії. Сьогодні пропоную ще один овочевий десерт - сирно-баклажановий торт. Я колись натрапила на розповідь про подібний десерт, але рецепту, на жаль, не зберегла. Ось моя спроба поєднати баклажан, сир, шоколад і цукор у щось смачне та красиве. Вийшло дуже навіть не погано, однак я бачу способи вдосконалення цього рецепту. Поки-що пілотна версія.

Інгредієнти:

  • 3 маленькі баклажани ( очищені та нарізані вздовж тоненькими скибочками)
  • 4\5 — 1 скл цукру
  • 4 стл рослинної олії
  • кориця
  • 1\4 скл мигдалю (легенько обсмажити і грубо подрібнити)
  • 1\4 скл родзинок ( грубо подрібнити)
  • 1 1\2 скл творогу
  • 1 яйце
  • цедра одного лимону
  • 5-6 листочків м”яти
  • 100 г чорного шоколаду
  • 3\4 скл молока
  • 3 стл борошна (1+2)

Перш за все потрібно приготувати баклажани. Для цього викладіть скибочки одним шаром на застелене пергаментом деко, легенько змажте олією і присипте тонким шаром цукру і легенько притрусіть корицею. Поверх викладіть ще один шар баклажанів і повторіть олію та цукор. Таким чином викладіть на деко усі баклажани. Запікайте у попередньо розігрітій до 175 градусів духовці протягом 15-20 хв (але уважно стежте, щоб воно не підгоріли).
Поки баклажани печуться можна зайнятись сиром. Додайте до нього близько 5 стл цукру ( додайте більше, якщо він видасться не достатньо солодким) і гарно перемішайте. Додайте цедру лимона і гарно подрібнені листочки м”яти. Вбийте яйце і ретельно перемішайте.
Коли баклажани уже майже готові, поставте шоколад на водяну баню. Коли він розтопиться додайте молоко і ретельно перемішайте ( молоко має бути гарячим, але не киплячим, щоб шоколад не згорнувся). Коли суміш буде гладкою і шовковистою, вмішайте 1 стл борошна.
Діставши баклажани, дозвольте їм трішки охолонути, щоб модна було брати руками. Застеліть пергаментом форму для торта.
Тепер можна починати збирати десерт. На дно застеленої форми викладіть тонкий, але суцільний шар баклажанів. Далі рівномірним шаром розподіліть 1\2 сиру і присипте горіхами та родзинками : кількість на ваш смак. Ложкою полийте це шоколадом, але не переборщіть: шоколад повинен бути розподілений тонко і рівномірно. Застеліть усе шаром баклажанів. Присипте його 1 стл борошна і 1 стл цукру. Знову шар сиру, горіхів, родзинок і шоколаду. Ретельно застеліть останній шар баклажанів, присипте його 1 стл борошна і 1 стл цукру.
Випікати у розігрітій до 200 градусів духовці протягом 30-40 хв (стежте, щоб верхній шар не підгорів).
Подавати цей десерт краще холодним: так він смачніший і краще тримає форму.
Спробуйте і поділіться враженнями.
Смачного!


I suppose it's OK that with the beginning of this little blog of mine I almost don't stop thinking about the kitchen: among the ideas for new dishes that keep me awake at night, long and regular tours around local market in quest for new interesting ingredients, keeping an eye on the assortment of cookware stores, endless talks about food with the most different people, little by little sort of ontology of kitchen starts to build itself up in my head, even though it's still on a very metaphorical stage. ( I will touch upon kitchen phenomenology itself as well as ethics, aesthetics, metaphysics etc. later on). So, kitchen is like a puppet theater where the ingredients are the dolls. The cook pulls the strings. But the difference is that unlike marionettes every ingredient has its character and ti make a successful play of flavors, temperatures, textures, colors etc. one has to find a specific approach to every product. There are some classical plays (or at least etudes) that work out great every time: the only thing needed is following the recipe – and this is wonderful. But today the different, non classical approach to cooking is out there ( as well as to all the other sciences and arts), which challenges everything that was used to be called “normal”.... (to be continued.)
Probably by accident my culinary motto this summer is “Vegetables – in desserts!”. There's been a couple of recipes from these series already. Today another vegetable recipe – cheese-n-eggplant dessert. I bumped into the story about a dessert like this a while ago but unfortunately didn't note the recipe. Here's my shot in combining eggplant, cheese, chocolate and sugar to make something tasty and pretty. It came out quite good but there are some ways to make it better, which I Will try the next time. For now, the pilot version.
Ingredients:

  • 3 small eggplants ( peeled and thinly sliced along)
  • 4\5 — 1 cup sugar
  • 4 tbsp vegetable oil
  • cinnamon
  • 1\4 cup almonds (slightly roasted and roughly chopped)
  • 1\4 cup raisins ( roughly chopped)
  • 1 1\2 cup cottage cheese
  • 1 egg
  • zest of one lemon
  • 5-6 mint leaves (finely chopped)
  • 100 g dark chocolate
  • 3\4 cup milk
  • 3 tbsp flour (1+2)

Firstly, cook the eggplant. Put the slices onto the baking tray (lined with baking paper) in thin layer, lightly grease with oil, sprinkle with sugar and cinnamon. Over the top place another layer of eggplant greasing and sprinkling with sugar and cinnamon as well. Keep doing this until all of the eggplant slices get to the tray. Bake for 15-20 minutes in preheated to 175 (c ) oven. (Keep an eye on them to prevent from burning).
For the cheese filling mix together cheese, about 5 tbsp sugar ( you can always add more if needed), lemon zest and min. Beat in the egg.
When the eggplant is almost cooked, put the chocolate in a saucepan over the steam bath. Add the hot milk to it when it is melted and mix carefully. Stir in 1 tbsp of flour.
After getting the eggplant out of the oven let it cool a little bit so that you can handle it with your fingers. Line a cake tin with baking paper.
Now it's time for “constructing” the dessert. Put a thin unbroken layer of eggplant to the bottom of the tin. Evenly spread 1\2 of cheese over the top of eggplant. Sprinkle with some almonds and raisins. With the spoon, pour some chocolate over the cheese: it has to be distributed thinly and evenly. Line another layer of eggplant. Sprinkle with 1 tbsp of flour and 1 tbsp of sugar. Repeat the layer of cheese, almonds, raisins and chocolate, again sprinkle with sugar and flour.
Bake in preheated to 200 (c ) oven for 30-40 minutes ( watch it! So that the top layer doesn't burn).
Serve it cold ( that way it holds its shape and tasted better).
Try it and let me know what you think.
Bon apetite!

воскресенье, 29 июля 2012 г.

Гарний ранок для маффінів з цукіні / Perfect morning for zucchini muffins


Зміна буденних декорацій бодай ненадовго завжди відкриває очі на те, що зі звичного середовища є по-справжньому цінним. Для мене, що стосується кухні, коротка подорож допомогла заново відкрити мій улюблений ніж, а також задоволення дещо лінивого літнього ранку, коли можна витратити годину для приготування маффінів до сніданку доки усі ще сплять, слідкувати за туркою на газі, щоб цінний напій не перекипів, читати книгу під ранкову тишу у ще-поки-м”якому сонячному світлі...
Сьогодні, літні маффіни з цукіні, сповнені смаку так все ж достатньо легкі, щоб стати ідеальних сніданком спекотного дня.

Інгрідієнти:
  • 1 цукіні середнього розміру(натертий)
  • 2 яйця
  • 1\2 скл сметани
  • 1\4 скл рослинної олії
  • 2 стл джему (будь-якого, на ваш смак; я використовувала полуничний)
  • 1\2 скл цукру
  • 1\2 скл борошна грубого помолу
  • 1\2 скл житнього борошна
  • 3\4 скл білого борошна
  • 2 чл розпушувача
  • 1 1\2 чл солі
  • 1\2-1 чл чорного перцю
  • 1\2 чл паприки
  • 1\4 чл зерен кмину
  • 1\2 чл сухого орегано
  • 1 дрібка кориці
  • 1\2 стл соди
  • 1 стл оцту

    Перш за все, потрібно змішати сухі інгрідієнти: борошно, сіль, розпушувач, спеції та відставити в сторону. В окремій великій мисці збити яйця, поступово додаючи до них цукор. Збивати, доки цукор повністю не розчиниться. Додати сметану та джем, гарно перемішати. Влити олію й перемішати, доки усі інгрідієнти гарно не поєднаються. Вмішайте натертий цукіні. Додайте сухі інгрідієнти ( 1\4 частина усієї суміші за раз), гарно перемішуючи між додаваннями. Щоб завершити тісто, додайте загашену оцтом соду й акуратно перемішайте.
    Формочки для маффінів, застелені пергаментом для випічки, заповніть тістом приблизно на 3\4. Випікати у попередньо розігрітій до 175 градусів духовці протягом 40-45 хвилин або доки зубочистка виходить чистою із центру. Діставши маффіни з духовки, накрийте їх кухонним рушником і дозвольте охолонути протягом 10-15 хв у формі. Перенесіть маффіни на решітку, щоб вони повністю охолонули.
    Вони смачні просто як є, однак сир, джем чи будь-що інше, що вам до вподоби, не зашкодить.
    Смачного!

It's always with changing the daily setting for a little while you start realizing what you really value about the usual one. For me, kitchenwise, a short stay away helped to rediscover my favorite knife and the pleasure of having a lazy summer morning from time to time with spending an hour to bake muffins till everybody else wakes up and keeping an eye of Turkish coffee pot so that the precious drink doesn't overboil and reading a book in the silence and still soft sunlight...
Today, summery zucchini muffins, filled with flavor but still light enough to make a perfect breakfast on the hot day.

Ingredients:
  • 1 medium size zucchini(grated)
  • 2 eggs
  • 1\2 cup crème fraiche
  • 1\4 cup vegetable oil
  • 2 tbsp jam (any kind you like, I used strawberry)
  • 1\2 cup sugar
  • 1\2 cup whole wheat flour
  • 1\2 cup rye flour
  • 3\4 cup white flour
  • 2 tsp baking powder
  • 1 1\2 tsp salt
  • 1\2-1 tsp black pepper
  • 1\2 tsp paprika
  • 1\4 tsp cumin seeds
  • 1\2 tsp dried oregano
  • 1 pinch cinnamon
  • 1\2 tbsp baking soda
  • 1 tbsp vinegar
    Firstly mix together dry ingredients: flours, salt, baking powder, spices and set aside. In a separate big bowl whisk the eggs gradually adding sugar till it completely dissolves. Add crème fraiche and jam, mix well. Pour in the oil and mix until well combined. Stir in grated zucchini. In 4 loads add the dry ingredients mixing well between additions. To finish the batter add mixed together baking soda and vinegar. Gently mix the batter until everything is well combined.
    Pour the batter into muffin molds(lined with baking paper) filling them approximately on 3\4. Bake in preheated to 175 degrees(c ) oven for 40-45 minutes or until the toothpick inserted in the middle comes out clean. After taking them out of the oven cover with kitchen towel and let cool in the molds for 10-15 minutes. Then transfer muffins to the wire rack and let them cool completely.
    Good to eat just as they are but some cheese or jam or anything else you like wouldn't make any harm.
    Bon Apetite!

пятница, 27 июля 2012 г.

Вишневий щербет / Cherry shcerbet


Заморожений вишневий десерт


Як гарно, що цього року літо ще не дошкуляє нам спекою, однак холодних десертів від того хочеться не менше, особливо зважаючи на те розмаїття ягід і фрукти, які так і просяться своїм смаком і своїм зовнішнім виглядом стати актором якоїсь кулінарної імпровізації. Серед інших, нарешті, з”явилась вишня, насичений смак якої — просто ідеальний для холодних літніх десертів. Сьогодні пропоную вашій увазі заморожене вишневе суфле.

Інгрідієнти:
1 л цілих вишень
1 склянка цукру (1\3 + 2\3)
1 стл лимонного соку
40 мл коньяку (опціонально)
3 яєчних жовтки
150-200 мл вершків(10%)
15 г желатину
5 яєчних білків
дрібка солі

В методі приготування велосипед не винаходився: класична технологія приготування суфле і пудингів.
Перш за все вишні потрібно очистити від кісточок, у сотейнику засипати 1\3 склянки цукру й поставити на маленький вогонь. Коли цукор розтане і сироп почне кипіти додати лимонний сік, коньяк і дозволити покипіти ще 1-2 хвилини. Зняти з вогню й родрібнити блендером до стану пюре.
Доки вишні з цукром розігріваються, в окремій глибокій мисці потрібно збити разом жовтки та вершки. Коли вишневе пюре буде готовим, частину його(1\3) потрібно поступово додати до вершкової суміші, постійно перемішуючи ( це робиться для того, щоб бодай трішки згладити контраст між температурами двох сумішей, які потрібно поєднати). Поєднані вершки, жовтки та пюре вилити назад до сотейника й повернути його на маленький вогонь. Постійно помішуючи, довести суміш до кипіння (“бубління”) й дати “побулькати” 1 хв. Не знімаючи з вогню, розчинити у суміші желатин. Зняти з вогню і дозволити охолонути до кімнатної температури, не забуваючи при цьому періодично помішувати.
Коли суміш охолодилась, можна приступати до приготування меренги, яка стане повітряною складовою десерту. Для цього яєчні білки збити з дрібкою солі до стану м”яких піків (маса гарно тримає форму, але ще не суха) й не припиняючи збивати, по 1 ложці за раз додати цукор, що залишився. Збивати, доки цкроу повністю не розчиниться.
Тепер ці дві частини потрібно об”єднати: до вишневої суміші додати трішки (1\5 — 1\6) збитих білків і акуратно, але ретельно перемішати (щоб зробити вишневу частину легшою). Додати рожеву суміш до меренги й обережно поєднати, намагаючись не пошкодити білкових бульбашок. Отриману суміш вилити до достатньо великого контейнера з кришкою й поставити до морозильної камери хоча б на 4-5 годин.
Заморозка — найгірша й найкраща частина цього десерту. Найгріша, бо чекати кілька годин — дуже не весело, але найкраща, бо робить його по справжньому освіжаючим. Тому терпіння вам і смачного!


Cherry Shcerbet

How nice is it that this summer doesn't bother to turn our cities into hell with heat. But frozen desserts haven't become least wanted due to that. Especially taking into account all the variety of fruits which with their flavor, aroma and appearance are asking to become actors in some gastronomic improvisation. Among others cherry is in season now and it's fresh overwhelming taste is just perfect for cold summer desserts. Today I'm pleased to present you my variant of cherry shcerbet.

Ingredients:
  • 1 l. (4 cups) whole sour cherries
  • 1 cup sugar (1\3 + 2\3)
  • 1 tbsp lemon juice
  • 40 ml cognac or brandy (optional)
  • 5 egg yolks
  • 150-200 ml cream (10-15%)
  • 15 g agar-agar (or gelatine)
  • 5 egg whites
  • pinch of salt

In the methods used I didn't try to invent the wheel: classical technology of making souffles and puddings. First all the cherries are to be pitted, which might take a while. Then in a sauce pan cover the pitted cherries with 1\3 cup sugar and start heating with low heat. When the sugar is dissolved and the syrup starts boiling add lemon juice and cognac and let boil for another 1-2 minutes. Take off the heat and blend it until smooth.
While cherries with sugar are being heated whisk cream and egg yolks together in a separate bowl.
When cherry puree is ready gradually add 1\3 part of it to the cream and egg yolk mixture stirring constantly ( this is done to even out the temperature contrast between two mixtures at least a little bit). Return the combined with cherry puree cream to the sauce pan and bring to soft boil over low heat and let it gently bubble for another 2-3 minutes while continuing to stir. Dissolve agar-agar or gelatine (which could be previously soaked in 5 tbsp of water) in a hot mixture. Take off the heat and let it cool down to room temperature remembering to stir occasionally.
When the cherry mixture is cooled it's time to start of meringue which is going to bring air and lightness into this dessert. For this whisk the egg whites with a pinch of salt (preferably with mechanical whisk) til it reaches soft peak stage (white and fluffy, holds the shape well but doesn't look dry yet). Continuing to whisk add the remaining sugar one tbsp at a time. Keep whisking until the sugar is completely dissolved.
Now the two mixture are to be combined. Add approximately 1\5-1\6 part of meringue to cherries and mix well with careful movements ( to make the cherry mixture a bit lighter). Now add the cherry mixture to egg whites and combine gently folding everything together. Be careful and to not to brake to many of the air bubbles. It's almost ready now. Pour the mixture into the ice-cream maker or into a large container (so that it isn't completely full) with lead and put it into the freezer for 4-6 hours. (You might want to stir it occasionally while it freezes – at least that's what I planned to do but got carries away with other business and completely forgot about the shcerbet in the freezer. When I remembered about it being in the freezer the next morning I thought It would be ruined and was surprised that it worked out perfectly fine without stirring. )
It might be hard to wait for it to freeze for so long but have patience. This the best part – what can be better than a frozen treat on a summer day?
Bon apetite!


четверг, 26 июля 2012 г.

Запіканка з пшона та зеленої цибулі / Green onions and millet casserole


Запіканка з пшона та зеленої цибулі


Ідею такої запіканки я підгледіла у своєї бабусі, коли гостювала у неї на минулому тижні. Однак в оригіналі це — не запіканка, а начинка для пиріжків. У домі моєї бабусі щотижня випікали і випікають пиріжки - це залишається без змін, але начинки змінюються у відповідності до сезонів. Ця начинка є типовою для весняного і літнього періодів, коли на городі є зелена цибуля. Вона виготовляється з найпростіших інгрідієнтів, але є дуже смачною й корисною. Мені здалось гарним її трішечки змінити і перетворити з начинки на запіканку, що у поєднанні із салатом стає повноцінною вегетаріанською стравою .

Інгрідієнти:
  • 1 скл сухого пшона
  • 100 г печериць
  • 1 морквина середнього розміру
  • 100 г зеленої цибулі
  • 1 яйце
  • 1\5 скл (50 мл) молока
  • сіль
  • перець
  • паприка
  • розмарин
  • коріандр

Приготування займе трішки вашого часу, однак весь процес — свята простота.
Перш за все варто відварити пшоно, всипавши склянку уже промитої крупи до киплячої води й готуючи на повільному вогні, доки воно не стане м”яким і досить густим. Готовій каші потрібно дати охолонути до кімнатної температури.
Тепер гриби й морква. Їх потрібно нарізати дрібними кубиками і по черзі легенько підсмажити на невеликій кількості олії. При цьому гриби, коли вони вже майже готові, приправити чорним перцем, а моркву ще до того як вона стане м”якою, приправити розмарином. І грибам і моркві потрібно дати охолонути.
Поки пшоно, гриби і морква вистигають, варто дрібно покришити зелену цибулю. В окремій посудині розбити яйце, молоко і добру кількість солі ( 1\2 — 1 стл). Коли всі гарячі складові охолонули їх потрібно змішати разом із зеленою цибулею у великій мисці, приправити це все чорним перцем на смак, чайною ложкою паприки, кількома цілими зернятками коріандру й гарно перемішати. Додати яєчно-молочну суміш і знову гарно перемішати. На цьому етапі обо”язково потрібно скуштувати й додати усього, чого не вистачає: ( я досолювала й “доперчувала” кілька разів).
Тепер потрібно підготувати невеличку скляну або керамічну форму для випічки, яку варто змастити олією й, за бажанням, можна присипати висівками (або сухарями) й зернятами льону та соняшника, щоб утворилась хрустка скоринка. Готову суміш обережно викласти у форму і вирівняти верх. Випікати у попередньо розігрітій до 180 градусів духовці протягом 40 — 45 хвилин, або доки зубочистка виходить чистою із середини. Запіканка повинна охолонути у формі добрих 30-60 хв. ( а бажано повністю, що дуже складно, коли не терпиться її скуштувати) після чого вона легко дістається з форми й нарізається шматочками.
Смачного!


Green onions and millet casserole

The idea of this casserole was overseen from my grandma while visiting her last week. Originally this was not a casserole but a filling for tarts of buns. In my grandma's house the buns as a treat for everybody are baked weekly – this doesn't change for decades now and has been the same way when she was a child. The only thing that changes are the fillings which depend mostly upon the season. This very filling is typical during spring and summer since there is a lot of green onions in the garden. It is cooked with the most simple ingredients but is healthy and delicious. It seemed like a good idea to change it a little bit and transform the filling into a casserole, which accompanied by salad becomes a great vegetarian meal.

Ingredients:
  • 1 cup dry millet
  • 100 g mushrooms (5-6)
  • 1 medium size carrot
  • 100 g green onions
  • 1 egg
  • 50 ml (1\5 cup milk)
  • salt
  • pepper
  • paprika
  • rosemary
  • coriander

The preparation will take some of your time but the whole process is just sancta simplicitas.
First of all the millet needs t be cooked. Drain the grains and put it into boiling water (around 2 cups of water for 1 cup of millet). Cook on low heat until the millet reaches tenderness and the porridge becomes thick. It need to cool to room temperature now.
Now to carrots and mushrooms. They have to be diced and sauteed on a little bit of oil (separated though: first carrots then mushrooms. When the carrots are almost ready add some rosemary to it(fresh or dry) and when mushrooms are almost ready sprinkle them with black pepper. Both carrots and mushrooms have to cool.
While all the precooked ingredients are cooling finely chop the green onions. In a separate bowl combine egg, milk and some salt (1\2 -1 tbsp). When everything has reached room temperature everything except for milk and egg mixture has to be mixed together in a big bowl. Add some more salt if needed, 1 tsp of paprika, 1\4 tsp of coriander seeds. Then add milk with egg and mix well. Be sure to taste the it because it's the last chance to add some more salt or pepper.
Now prep the baking dish (glass of ceramic). Oil it and sprinkle with some breadcrumbs or seeds (sunflower, flax, sesame) to form a crust. Carefully put the mixture into baking dish, push it well in and even out the top. Bake in a preheated to 180 degrees (c ) oven for 40-45 minutes or until toothpick inserted in the middle comes out clean. After baking the casserole has to cool down in a baking dish for at least one hour (preferably it has to cool down completely which is really hard since you are eager to try it) . After this it come out of the baking dish easily and can be cut into slices.
Bon apetite!

Повернення і зміни / Coming back and changing


- Повернення додому завжди супроводжується величезною кількістю натхнення і нового бачення уже звичних речей. Цим власне і визначається якість самої подорожі: якщо вдалося розгледіти нові підходи до буденних занять, якщо на горизонті смислів з"явилося нове розуміння, а щоденний рух набув нових цілей, то кілька тижнів і досі невідомому середовищі таки дають і даватимуть про себе знати. Сказати по правді, я сама заінтригована : куди мене це все приведе.... але це згодом.

Щодо змін тут і тепер, то відтепер моя маленька кулінарна сторінка змінює свою основну локацію, хоча версія вконтакті також буде оновлюватись. З оновленням місце знаходження оновлюється і контент: відтепер усі пости з"являтимуться двома мовами (українською та англійською).  Наразі поруч із новими постами я планую перевести у двомовний формат усі попередні, тому наперед вибачаюсь за можливу непослідовність.
Зміни не грандіозні, однак я з захопленням чекаю того, що вони принесуть. Сподіваюсь, це на краще) Привіт, новий дім!
-Настя Т. 


Coming back home is always accompanied by huge amount of inspiration and the new vision of usual things. This is what the quality of the journey is determined by. If you got to notice new approaches to usual affairs, if there is a new understanding on the horizon of meaning and the everyday motion has gained some new goals than a couple of weeks spent in an unknown environment are reminding and will be reminding of themselves. To be honest, I myself am not sure where is it going to bring me... but that's for later.
As to the changes here and now... my little culinary page changes it's primary location : from vk to blogspot ( the vk version is going to be kept updated as well). With the change of location the content changes too: from now on all the posts will appear in Ukrainian and English. For now, apart from new post the plan is to transform into bilingual format the old ones. Therefore I apologize in advance for all the possible inconsistency.
The changes are not grand but I'm still excited  to see where will they bring me. Hope for the best.
Hello, new home!
-Nastya T.